
If you’ve already tackled organizing your toolbox but your garage walls are still a chaotic mess of hanging nails and randomly placed tools, a pegboard setup is your next best move.
It’s one of the most affordable, flexible, and visually satisfying upgrades you can make to a garage workspace.
In this article, you will learn how to set up a pegboard for the tools in your garage.
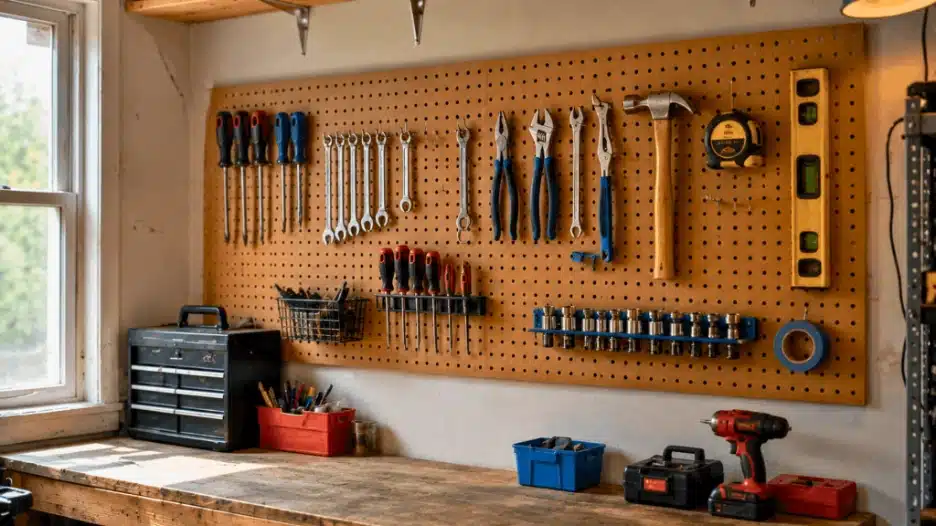
A properly installed pegboard transforms dead wall space into a fully functional tool display that keeps everything visible, accessible, and right where you need it.
What Is a Pegboard and Why Should You Use One?
A pegboard, also called a perforated hardboard or pegboard, is a flat panel with evenly spaced holes designed to accept hooks, bins, and holders.
You can see every tool at a glance, grab what you need without digging, and immediately notice when something is missing.
For garage spaces, especially small ones, pegboards are a game-changer because they use vertical wall space, the most underutilized real estate in any garage. Instead of cluttering your workbench or floor, your tools go up on the wall, freeing up the surfaces where you actually work.
What You’ll Need
Before you pick up a drill, it pays to have everything ready. Here’s what you’ll need to get the job done right:
For the board itself:
- Pegboard panels (standard hardboard or metal, more on this below)
- 1×4 or 2×4 lumber strips (called “furring strips”) for mounting
- Wood screws or drywall anchors
- A level
- A stud finder
- A drill and drill bits
- A tape measure and a pencil
For the hooks and accessories:
- Assorted pegboard hooks (single, double, J-hooks, L-hooks)
- Pegboard bins or cups for small parts
- Pegboard shelves for heavier items
- Optional: pegboard locking clips to keep hooks from falling out
Having all of this ready before you start means you won’t be stopping mid-project to run to the hardware store.
How to Set Up a Pegboard for Tools in Your Garage
Step 1: Choose the Right Pegboard Material
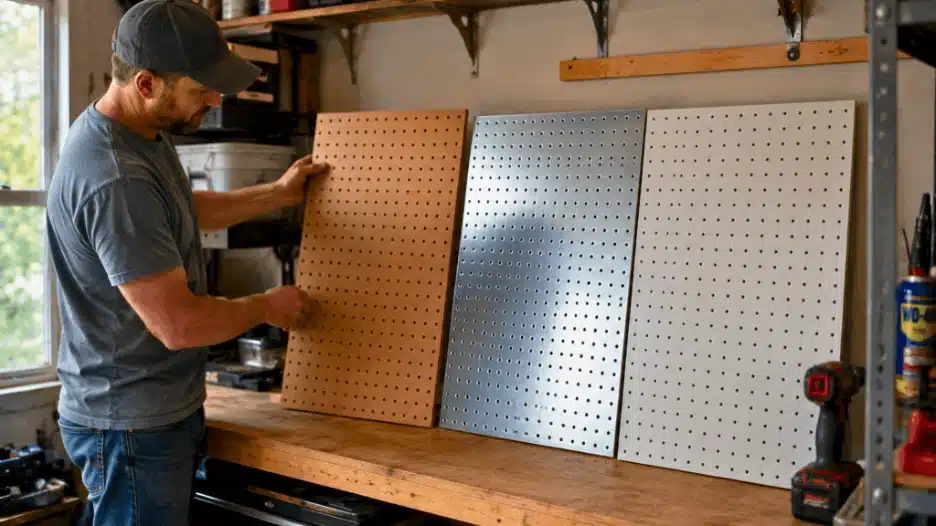
Not all pegboards are created equal. The three main types you’ll encounter are:
Standard Hardboard (Brown/Tempered) is the most common and affordable option. It works well for light to medium-weight tools like screwdrivers, pliers, wrenches, and tape measures. It’s easy to cut to size and widely available at any hardware store.
The downside is that it can bow or warp if exposed to moisture, so it’s best suited for enclosed or dry garages.
Metal Pegboard (Steel or Aluminum) is the heavy-duty option. It handles heavier tools like power tool accessories, hammers, and socket sets without bending. Metal pegboards also tend to look more professional and are more resistant to humidity and temperature changes, ideal for garages that get hot in summer or damp in winter.
Plastic Pegboard sits somewhere in the middle. It’s moisture-resistant, lightweight, and doesn’t rust, but it can flex under heavier loads. It’s a solid choice for lighter tool collections or utility rooms.
For most garage setups, tempered hardboard or steel pegboard is the recommended choice, depending on your budget and tool weight.
Step 2: Plan Your Layout Before You Mount Anything
Before drilling a single hole in your wall, take 10 minutes to plan the layout. Ask yourself:
- How much wall space do I have? Measure the width and height of the area you’re working with.
- What tools do I need on the pegboard? Prioritize the tools you reach for most. Daily-use items should be at eye level and centered.
- How heavy are my tools? Heavier tools should be placed lower and closer to wall studs for stronger support.
- Do I want a single large panel or multiple smaller panels? One large panel looks clean but can be harder to mount. Multiple smaller panels give you flexibility to expand later.
Sketching a rough outline on paper, even a simple one, saves you from constantly rearranging hooks after the fact. Some people even lay their tools out on the floor in the shape of the pegboard first to visualize spacing.
Step 3: Mount the Furring Strips First
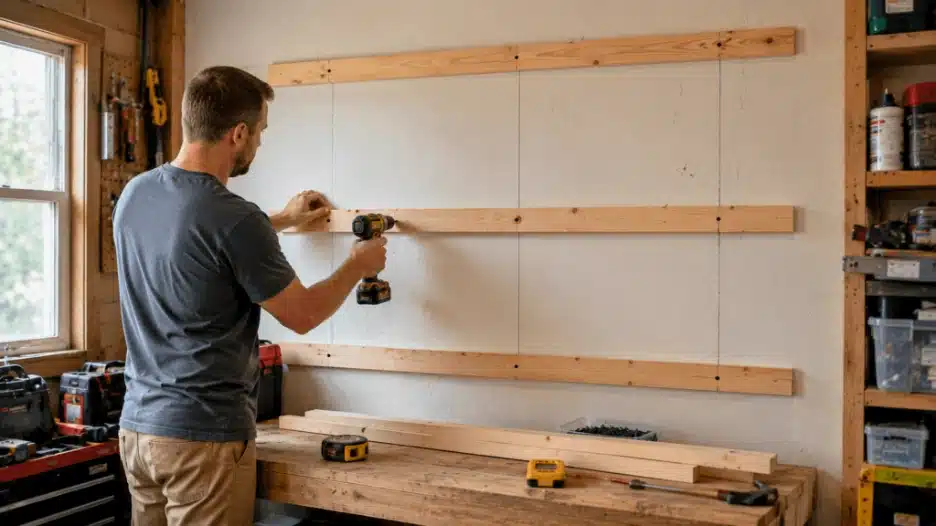
Pegboards need to sit slightly away from the wall (about 1/2 inch to 1 inch) so that hooks can pass through the holes and have room to lock in place behind the board.
The way you create that gap is with furring strips. These are thin pieces of lumber that you mount directly to the wall first. You’ll cut them to match the width of your board and position them at the top, bottom, and middle.
The pegboard then attaches to those strips instead of the wall itself, giving you the spacing you need and a much stronger anchor point.
Here’s how to do it properly:
- Find the wall studs in your target area with your stud finder. Mark them lightly with a pencil.
- Cut your furring strips to the width of your pegboard.
- Hold the first strip at the top of where your board will sit and use your level to ensure it’s perfectly horizontal.
- Drill the furring strip directly into the wall studs using wood screws. Studs provide far more holding power than drywall anchors alone, especially if you’re hanging heavy tools.
- Repeat for the bottom strip and any middle supports (for boards taller than 3 feet, add a middle strip).
Getting your furring strips level and firmly anchored into studs is what separates a solid, long-lasting pegboard installation from one that shifts and sags over time.
Step 4: Cut and Mount the Pegboard Panel
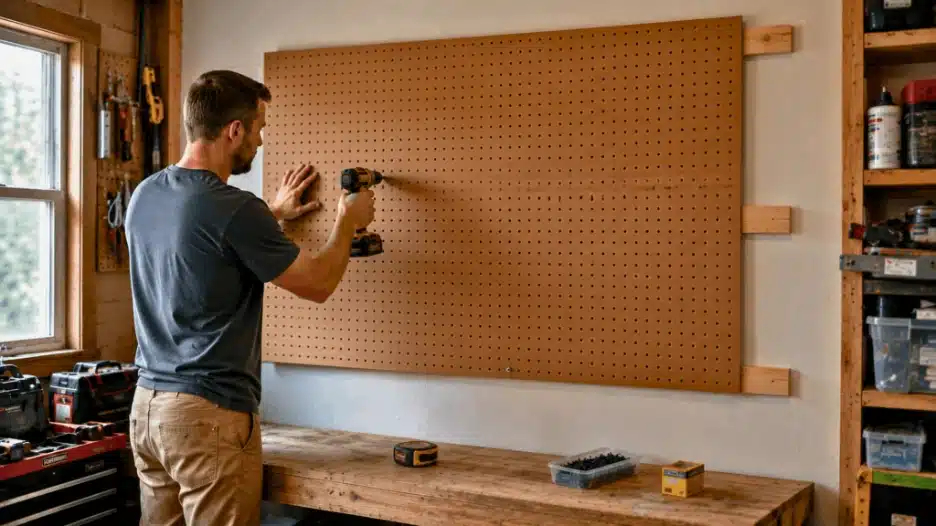
With your furring strips in place, mounting the pegboard itself is straightforward.
- If your pegboard needs to be trimmed to fit your space, use a circular saw or jigsaw with a fine-tooth blade. Cut slowly to avoid chipping the edges.
- Hold the pegboard up against the furring strips. Have a helper hold it steady while you check it’s level.
- Pre-drill pilot holes through the pegboard and into the furring strips. This prevents the board from cracking or splitting.
- Drive screws through the pegboard and into the furring strips. Don’t overtighten; you want the board to sit flush and flat without warping.
- Check again that the board is level and that it sits evenly away from the wall across its entire surface.
At this point, your pegboard is mounted and ready for hooks. Give the board a firm push and shake test. If it feels solid and doesn’t flex or shift, you’ve done it right.
Step 5: Set Up Your Hooks and Accessories
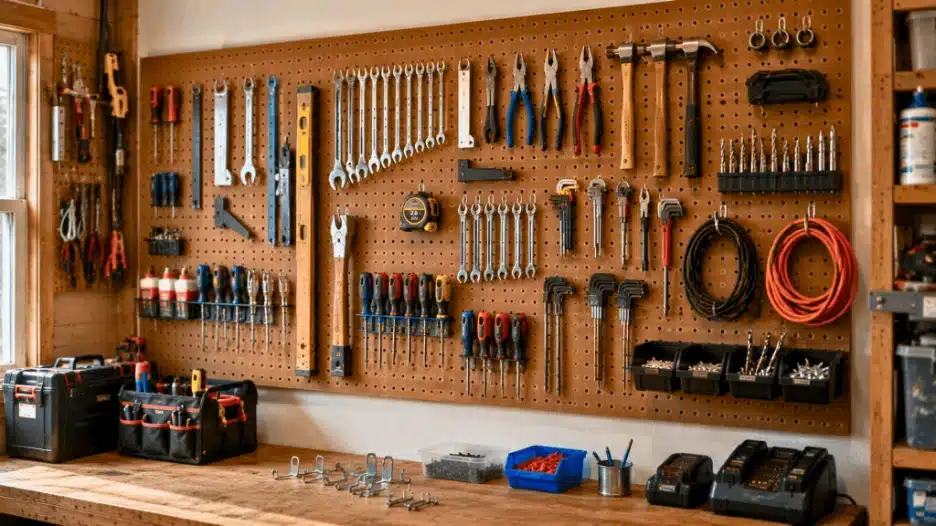
Now comes the satisfying part: loading it up. The way you arrange your tools matters just as much as having the right hooks, so it’s worth following a system rather than just hanging things wherever they fit.
Start by zoning your board by tool category: Group tools by function rather than hanging them randomly. Put wrenches in descending order of size, screwdrivers together, cutting tools in one place, and measuring tools in another. This makes it fast to find what you need and easy to spot when something is missing.
Use the right hook for each tool: Not all hooks are built the same, and using the wrong one leads to tools falling or sitting at awkward angles. Here’s a simple guide:
- Single hooks for screwdrivers, pliers, and small hand tools
- Double hooks or J-hooks for longer and heavier tools like levels, squares, and hammers
- L-hooks for power tool accessories and extension cords
- Bins and cups for loose items like drill bits, Allen keys, and small fasteners
Place your most used tools at eye level in the center of the board: That’s the easiest zone to reach and the first place your eyes go. Less frequently used tools can go higher up or toward the edges.
Hang heavier tools lower on the board: Working from heaviest at the bottom to lightest at the top keeps the weight distribution balanced and reduces stress on the upper part of the board over time.
Add locking clips to every hook before you call it done: Standard hooks pop out easily because pulling a tool forward lifts the back of the hook right out of the hole. Locking clips are small plastic pieces that slide over the hook legs and grip the back of the board, keeping each hook locked in place no matter how many times you grab the tool. They’re inexpensive, and they completely change how reliable the whole setup feels day to day.
Step 6: Label Your Tool Outlines (Optional but Highly Recommended)
Once your tools are arranged the way you like them, consider tracing the outline of each tool directly on the pegboard with a marker or paint pen. This is called a tool shadow board technique, and it offers two major benefits:
First, you always know exactly where each tool belongs; that way, you won’t need to start guessing or rearranging. Second, it makes it obvious immediately when a tool is missing from the board because the empty outline stands out. This is especially useful in shared garages or workshops where multiple people use the same tools.
For a cleaner, more professional look, you can use pre-cut foam outlines or simply trace with a paint marker in a contrasting color to the board. It takes an extra 20-30 minutes, but it completely changes how functional and intentional the whole setup looks.
Step 7: Maintain and Expand Over Time
A pegboard is not a one-and-done project. It’s a living system that should evolve with your tool collection. The beauty of a pegboard is that hooks are infinitely repositionable. As you add new tools, get new equipment, or simply realize a better layout, you can rearrange everything in minutes without touching a drill.
A few habits that keep your pegboard working at its best over time:
- Put tools back in their spot immediately after use. This sounds obvious, but it’s the one habit that separates an organized garage from a chaotic one. The system only works if you use it.
- Do a quarterly reset. Every few months, take everything off the board, wipe it down, and rehang with fresh eyes. You’ll often find better arrangements you hadn’t thought of before.
- Add sections as your collection grows. If you run out of space, add a second panel adjacent to the first or install a smaller board on a side wall for overflow. Pegboards are modular by nature.
Common Pegboard Mistakes to Avoid
Even a simple project like this has a few pitfalls worth knowing about in advance:
Skipping the furring strips is the most common mistake. Without them, hooks can’t lock in properly, and the board will eventually pull away from the wall. Always use furring strips.
Mounting into drywall only without hitting studs, is the second biggest mistake. Drywall anchors alone are not reliable for a loaded pegboard. Always find and use your studs.
Buying too few hooks. You’ll almost always need more than you think. Buy a variety pack with multiple hook types so you have options without making extra trips.
Making the board too small. If in doubt, go bigger. It’s much easier to leave space on a large board than to wish you had more room six months later.
Conclusion
Setting up a pegboard in your garage is one of the highest-return projects you can tackle in an afternoon. The materials are affordable, the installation is manageable for most skill levels, and the payoff, a fully organized, instantly accessible tool wall, is immediate and lasting.
Combined with a well-labeled toolbox beneath it, your garage workspace becomes the kind of setup where you can find any tool in under three seconds, work more efficiently, and actually enjoy spending time in the space.
If you haven’t already sorted out your toolbox drawers to match the same level of organization, check out our Custom Toolbox Drawer Labels, the perfect complement to a clean pegboard setup.