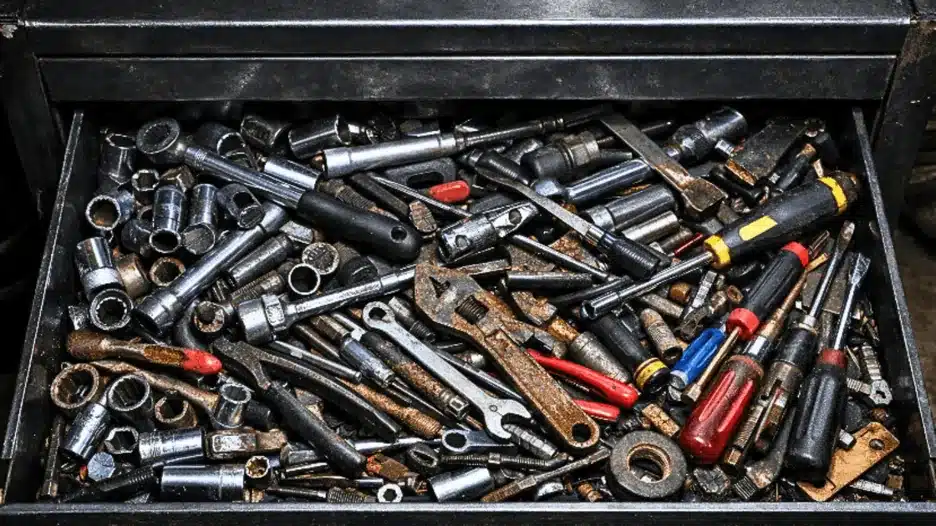
If you’ve ever opened four drawers just to find one socket, this guide is for you. You will get to fix this problem permanently and it takes far less time than you think.
Before You Start Labeling, Get This Right First
Here’s the thing most people skip. They get excited about organizing, they buy labels, they start sticking things on drawers before sorting a single tool, and then two weeks later the whole system falls apart because the labels don’t match what’s actually inside the drawer anymore.
Labeling is the last step of organizing, not the first. Meaning, a label is only as useful as the system behind it. If drawer number three has sockets on Monday and wrenches by Friday, the label becomes a lie.
However, a lying label is somehow worse than no label at all because now you’re second-guessing every drawer you open.
So before you touch a single label, you need two things sorted.
Your tools need to be grouped into categories
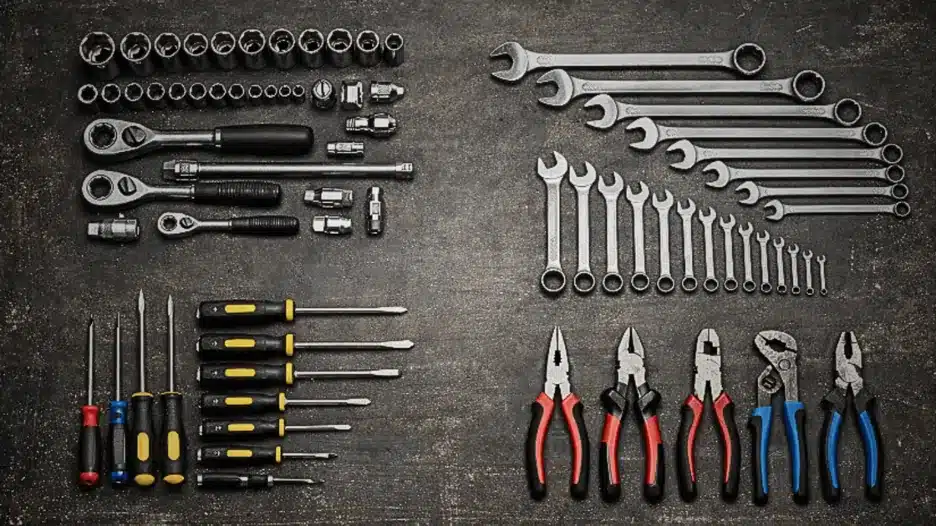
Pull everything out, lay it on the workbench, and sort by tool type. Sockets together, wrenches together, screwdrivers together, pliers together.
Don’t sort by job like “brake stuff” or “suspension stuff” because most tools cross over between jobs and you’ll end up with the same tool assigned to three different drawers in your head.
Each category needs a permanent home in a specific drawer.
This is where you decide what lives where. Think about frequency of use here. The tools you grab ten times a day, your sockets, your combination wrenches, those go in the drawers that are easiest to reach, usually the middle ones at natural hand height.
The stuff you only pull out occasionally goes higher up or in the big bottom drawer. Once you’ve made these decisions, write them down. Seriously, just a quick note on your phone or a piece of paper.
It sounds unnecessary but it saves you from second-guessing yourself when you’re halfway through labeling.
Now about the labels themselves, because this matters more than people realize.
A lot of mechanics grab a label maker or some masking tape, write on it, and call it done. That works for about three months. Then the edges start peeling, grease gets underneath, the adhesive fails, and you’re left with sticky residue on a drawer face that’s genuinely annoying to clean off metal.
Paper labels are even worse because they absorb moisture and grease and just fall apart in a garage environment.
Magnetic labels are the practical choice for toolboxes specifically because your toolbox is already a metal surface.
The magnet holds without any adhesive at all, it won’t peel, it won’t leave residue, and if you ever reorganize a drawer you just slide the label off and move it. No scraping, no residue, no drama.
The only real downside is the upfront cost is slightly higher than a roll of tape, but think about it this way, you’re buying a set of labels once and they stay functional for years versus buying new tape labels every few months.
If you want the labels to actually look professional, custom printed magnetic labels are the real deal.
You get your exact text printed on a durable magnetic backing, you choose the font, you choose the color you want, and it looks like it was made for your toolbox because it was.
The Custom Magnetic Toolbox Drawer Labels from Automotive Accessories NA come as a set of 8, which covers most standard toolbox setups, with free shipping to Canada, the USA, and Australia for $39.99 CAD.
At this stage you’re ready to actually label things.
How to Label Your Toolbox Drawers Step by Step
Step 1: Decide What Text Goes on Each Label
This sounds simple but it’s where a lot of people make avoidable mistakes. The most common one is being too vague.
Writing “Sockets” on a drawer is fine if you only have one socket drawer but if you have three drawers of sockets broken down by drive size, which most serious mechanics do, then “Sockets” tells you almost nothing.
Be specific enough to be useful, short enough to read at a glance. Two to four words is the sweet spot. Here are some real examples of label text that works well in practice:
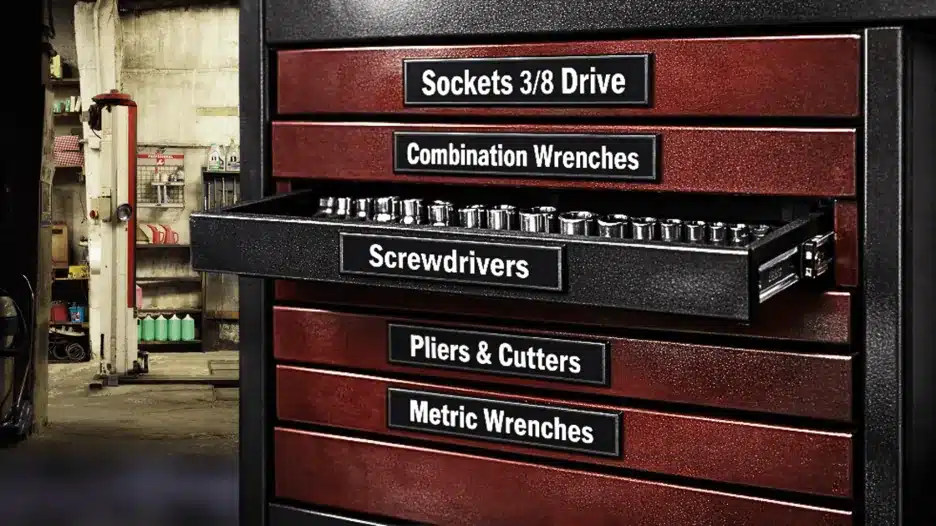
- Sockets 3/8″ Drive
- Sockets 1/2″ Drive
- Combination Wrenches
- Screwdrivers
- Pliers and Cutters
- Torque Wrenches
- Allen and Torx Keys
- Electrical Tools
- Specialty Tools
- Fasteners & Hardware
You’re describing the category in the drawer, not every single tool inside it.
You don’t need to list every socket size on the label. “Sockets 3/8″ Drive” is enough because you already know what that drawer contains, that’s the whole point of the system you built in the prerequisite step.
Step 2: Choose Your Font and Color Combination
If you’re ordering custom printed labels, this is where you make it look intentional rather than thrown together. The key thing to keep in mind here is readability in a real workshop environment.
You’re reading these labels quickly, sometimes from a slight angle, sometimes in imperfect lighting, usually with something else on your mind.
Bold and clean beats stylish every time. Anton is a heavy, high-impact font that reads well even at small sizes.
Roboto is a cleaner modern choice that’s easy on the eyes. EXO-2 lands somewhere between the two with a slightly technical look that fits well in a shop environment. Any of the three work, just avoid anything thin or decorative.
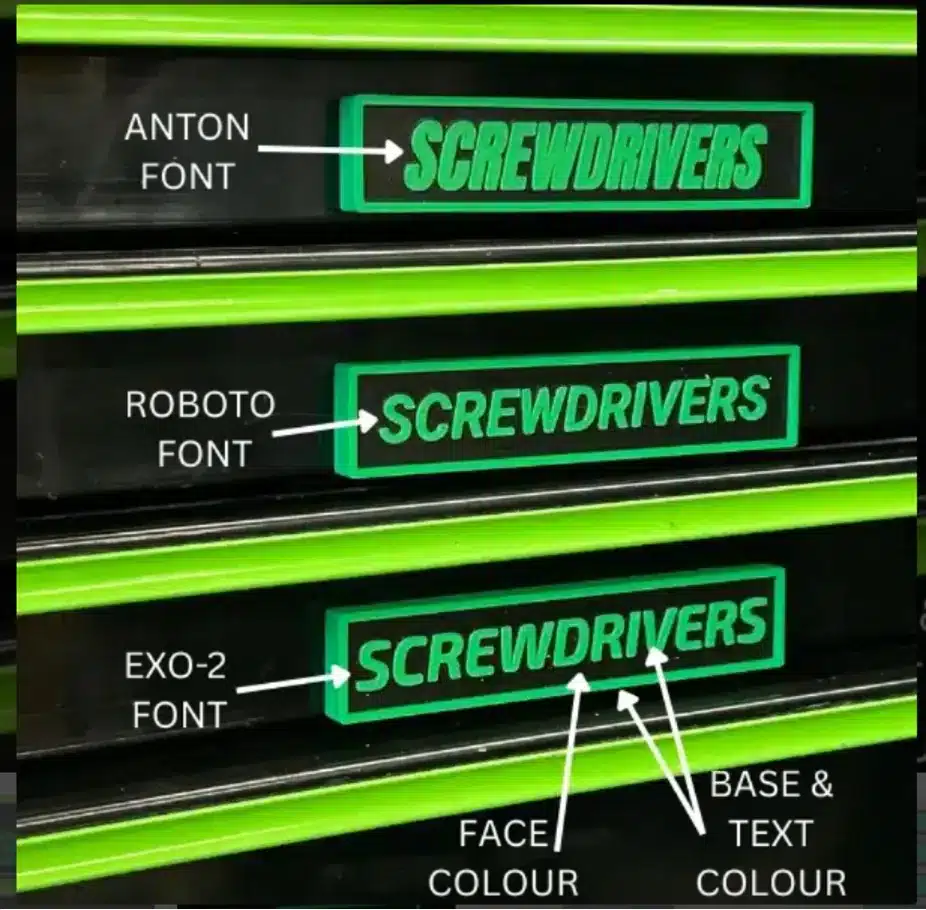
For colors, the goal is contrast. Light text on a dark background or dark text on a light background. White on black reads clearly.
Black on white works just as well. If you want something that stands out against a dark toolbox finish, white text on a green or blue background gives you a sharp visible contrast without looking flashy.
Step 3: Place Your Order Before Reassembling the Toolbox
This one is really easy to skip and really costly to skip. Once you know exactly what text goes on each label, place your order while the toolbox is still empty.
Here’s what happens when you don’t. You reassemble the toolbox first, just temporarily, just while you wait for the labels.
But then the tools are back inside and the job feels mostly done and the urgency disappears. A week passes. A month passes. The toolbox is still unlabeled and you’re back to opening four drawers to find one socket.
Order first, then wait, then label, then put everything back. It’s a slightly uncomfortable twenty minute gap between sorting and reassembling but it’s the step that actually makes the whole system permanent.
Step 4: Apply the Labels and Put Your Tools Back
Magnetic labels attach instantly. You don’t need tools, adhesive, or any prep work. Just press the label to the drawer face and position it where you want it.
For placement, center it horizontally on the drawer. Eye level or just below works best for visibility when you’re standing in front of the toolbox.
If the drawer has a handle or pull, position the label either above or just below it, wherever it stays visible when the drawer is closed.
Now put your tools back, category by category, following the plan you made before you started. Take a few extra minutes here to actually lay the tools in neatly, flat and grouped within the drawer.
Tools that are placed well stay organized longer because there’s a natural logic to where everything sits. Tools that are just thrown in start migrating into each other within a few weeks and suddenly the labeling system is fighting against the chaos inside the drawer instead of working with it.
As you close each drawer, do one quick check. Does what’s inside match what the label says? If something doesn’t fit the category, sort it out now before you button everything up. It’s a much easier problem to solve with the toolbox open than with everything already back inside.
Step 5: Build One Small Habit to Keep It Working
The system you just built only stays useful if you return every tool to its labeled drawer after every job.
That’s the whole thing. That’s the one habit that makes the difference between a toolbox that stays organized for years and one that’s back to chaos within a month.
At the end of every job, before you move on, put the tools back. It takes two minutes when everything has a clear labeled home. It’s not discipline, it’s actually easier than leaving things scattered because you never have to search for anything the next time.
And when your tool collection grows, which it will, the magnetic labels make that easy to adapt to. You can move labels between drawers, create new categories, or reorganize the entire layout without any damage to the toolbox.
The system evolves with you instead of locking you into something that stops working the moment anything changes.
Conclusion
Labeling your toolbox drawers isn’t complicated but it does need to be done in the right order and with the right materials.
Sort first, assign categories to drawers, decide on your label text, and then label before you put anything back.
Magnetic labels are the right call for this environment because they hold up, they look clean, and they stay flexible when your setup changes. If you do it once with actual intention behind it, you probably won’t need to do it again for a very long time.
If you’re ready to get your toolbox labeled properly, you can order a set of 8 Custom Magnetic Toolbox Drawer Labels with your exact text, font, and color choice, shipped free to Canada, the USA, and Australia.
And if you want to understand why magnetic labels are a better long-term choice than stickers or tape in more detail, this article breaks it all down: Printed Magnetic Labels to Fix a Messy Toolbox.