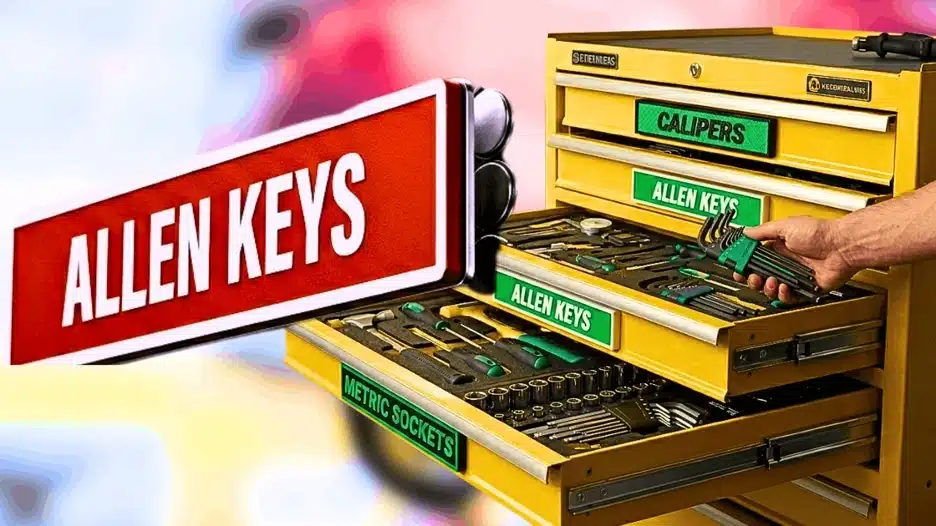
Printed magnetic labels identify drawers and storage spaces without adhesive. Some use text printed on flexible magnetic sheets. Others are rigid, 3D-printed plastic labels fitted with magnets. Both can help you name toolbox drawers, but their materials and fit differ.
For a toolbox, start with three checks: does the drawer front attract a magnet, will the label fit, and can you read the wording easily? This guide explains what to look for before choosing labels for your tools.
What Are Printed Magnetic Labels?
The word “printed” can describe two different ways of making a magnetic label:
- Printed magnetic sheets: Words or graphics are printed onto material with a magnetic backing. Some sheets are made for a specific type of home or office printer.
- 3D-printed magnetic labels: A 3D printer builds a solid plastic label, and magnets provide the attachment. These are not sheets you feed through a normal printer.
Automotive Accessories NA makes the second type: 3D-printed PLA plastic drawer labels with neodymium magnets. PLA is the plastic used for the label body. The magnets attach the label to a suitable drawer front.
For either type, check the actual product details. The word “magnetic” alone does not tell you the label’s size, flexibility, or resistance to workshop conditions.
Check Whether Your Drawer Front Attracts Magnets
Magnets do not stick to every metal. Ordinary steel often works, but aluminium and plastic will not hold a magnetic label directly. Stainless steel varies: some types attract magnets, while others do not.
Test the exact spot where you want the label using a magnet you already own. Check the drawer front itself, since handles and trim may use a different material.
A successful test is a useful first check, not a guarantee of how every label will hold. The label’s magnets, the surface finish, and how closely the label sits against the drawer all matter.
If the surface does not attract a magnet, choose an adhesive label suited to that material or a suitable label holder.
Measure the Space You Can Actually Use
Measure the flat area available for a label, rather than the full drawer width. Handles, locks, raised edges, and curved panels can reduce that space.
Before ordering, check:
- Width and height: Will the whole label fit on the flat area?
- Depth: Could the label catch on a handle, nearby drawer, or cabinet door?
- Visibility: Can you read it with the drawers closed?
- Placement: Can you use the same clear position across the drawers you want to label?
Cut a paper shape to the listed label size and hold it against the drawer. This helps you judge the layout before buying. Compare your measurements with the seller’s label dimensions, and ask whether those dimensions describe one label if the listing is unclear.
Magnetic or Adhesive Labels: Which Suits Your Drawers?
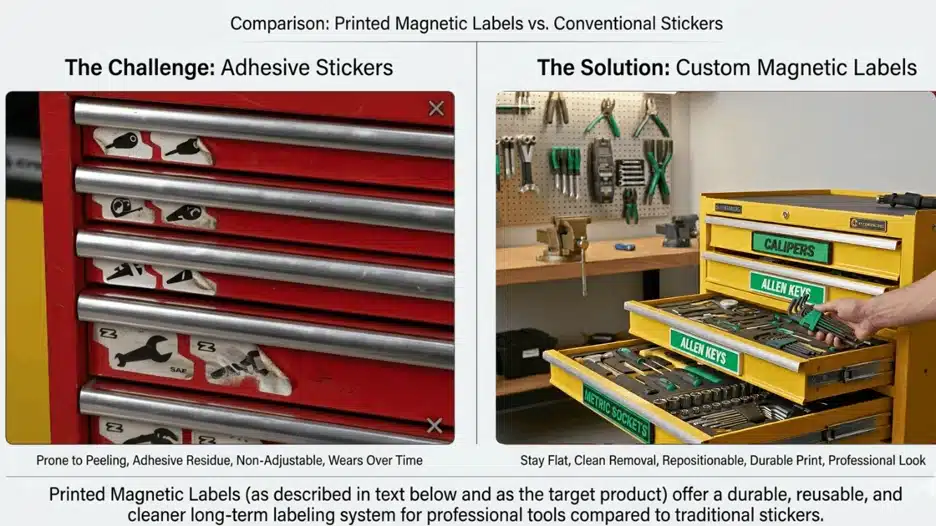
Magnetic labels suit drawers you may reorganize, as long as the surface attracts magnets. Adhesive labels can be a good choice for fixed layouts or surfaces where magnets will not attach.
The worn stickers shown above are one possible outcome, not a rule for all adhesive labels. Either type can work well when its material and attachment suit the surface and conditions.
| Consideration | Magnetic Labels | Adhesive Labels |
|---|---|---|
| Surface | Needs a surface that attracts magnets. | Needs an adhesive suited to the surface and finish. |
| Changing the layout | Can move to another compatible drawer. | May need replacement; some types are removable. |
| Removal | No adhesive residue, but trapped dirt can mark the finish. | Residue and cleanup depend on the adhesive, surface, and age. |
| Workshop use | Check fit and the maker’s care guidance. | Check material, adhesive, and cleaning guidance. |
For a fuller comparison, read our guide to magnetic versus adhesive labels.
Choose Standard or Custom Drawer Names
Standard labels work well when their wording matches your drawers. Names such as “Sockets,” “Pliers,” and “Screwdrivers” may be all you need. Check the full list in a ready-made pack so you know which labels you will use.
Custom wording helps when you need to separate similar groups or name a drawer for a specific job. Choose names based on what is inside:
- By tool type: Wrenches, Spanners, Pliers, Allen Keys, or Measuring Tools.
- By size system: Metric Sockets or SAE Sockets for inch-size tools.
- By task: Electrical Tools or Brake Tools when those tools share a drawer.
These are wording ideas, not a promise that every phrase fits every label. Check text limits before ordering.
Use the names you and anyone sharing the toolbox already know. “Wrenches” and “Spanners” can both work; consistency matters more than choosing one term for everyone.
What to Check If a Magnetic Label Moves
A label needs good contact with a suitable surface. If it slips or sits loosely, check the fit before assuming the magnets don’t work.
- Test the mounting spot with another magnet to check whether the surface attracts it.
- Check for curves, raised trim, or edges that keep the label from sitting flat.
- Remove dust or grit from the drawer front and the back of the label.
- Make sure your hand or a nearby part does not knock the label during use.
If none of the above works, contact the company you bought the labels from and see if they can help.
When Removable Labels Are Most Useful
Removable labels are useful when a growing tool collection changes your drawer layout. You can move a label with its tools instead of peeling off an old name and making another.
They also help in shared workshops, where clear names show everyone where tools belong. Compatible steel cabinets and storage racks can use the same approach, provided the label fits and the surface attracts magnets.
Labels work best after you decide what belongs in each drawer. If your layout still needs work, follow our guide on how to label toolbox drawers.
Make Printed Magnetic Labels Easy to Read
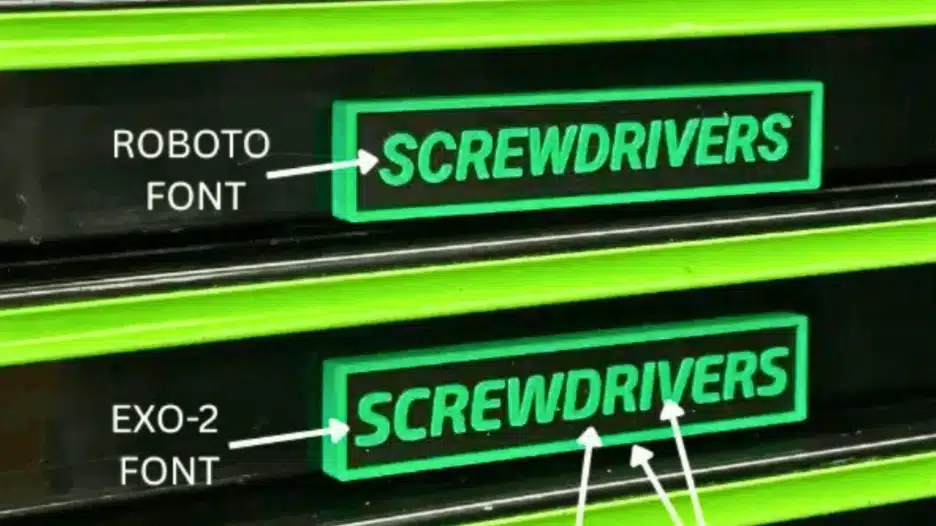
Choose a font you can read quickly in your usual workshop lighting. A simple design is more useful than decorative lettering if you need to lean closer to read it.
Keep drawer names short enough for clear text. If a phrase needs tiny letters to fit, shorten it or ask the company about another size. Do not assume a longer name will stay equally readable.
Use strong contrast between the letters and the background, such as light text on a dark face. Colour can help group drawers, but keep the wording clear enough to work on its own.
Place and Care for Your Labels
Keep the drawer front and the label’s contact surface clean before fitting it. Position the label clear of handles and moving parts, then check that the drawer opens and closes freely.
Lift the label to reposition it instead of dragging it across the paint. Dirt or grit trapped underneath can mark a finish, even when the label uses no adhesive. Follow the label maker’s care advice and use only cleaning methods suitable for the toolbox finish.
Before You Order
- Test the exact mounting area with a magnet.
- Measure the usable flat space and check the label dimensions.
- Count the drawers you want to label.
- Review each drawer name for spelling and length.
- Choose a clear font and contrasting colours.
- Check the current price, delivery terms, and final checkout total.
Choose Your Custom Toolbox Labels
Our custom magnetic toolbox labels come in a set of eight, with your own wording for each label. Choose Anton, Roboto, or EXO-2, plus contrasting body/text and face colours from the available options.
Check the product page for current pricing and ordering details. Have your eight drawer names ready so you can review them together before submitting your order.